> ## Documentation Index
> Fetch the complete documentation index at: https://domoinc-bradley-turek-pfilter-operators-reference.mintlify.site/llms.txt
> Use this file to discover all available pages before exploring further.
# Salesforce Rest Writeback Connector
## Intro
Salesforce is acloud-based Customer Relationship Management (CRM) platform. Use the Domo Salesforce Rest Writeback connector to export data from a Domo DataSet to your Salesforce account through the REST API.
You can connect to your Salesforce Rest Writeback account in the Data Center. This topic discusses the fields and menus specific to the Salesforce Rest Writeback connector user interface. To add DataSets, set update schedules, and edit DataSet information, see [Adding a DataSet Using a Connector](/s/article/360042926274).
## Prerequisites
To configure the Salesforce Rest Writeback connector and create a Domo DataSet, you must provide the following:
* Domo Client ID
* Domo Client Secret
* Salesforce Environment selection
### Generating Domo Client ID and Client Secret
The Domo Client ID and Client Secret can be generated within the Domo instance.
To generate the Domo Client ID and Secret, follow the steps below:
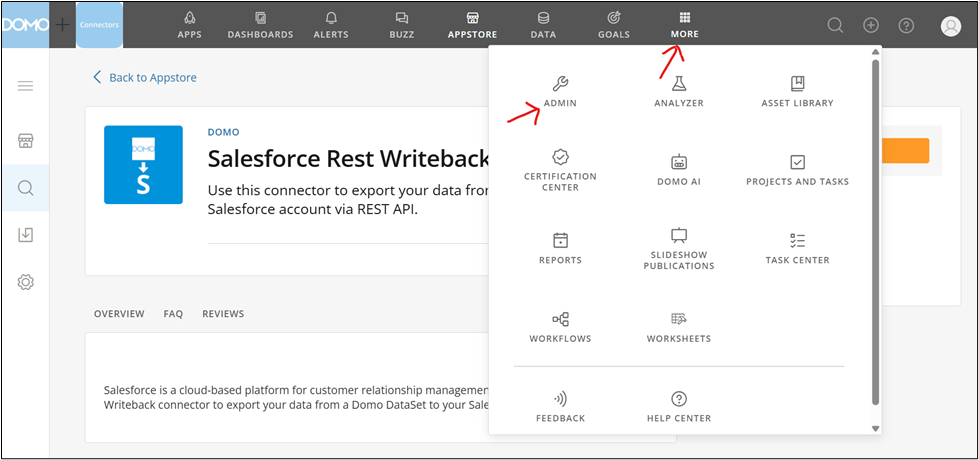
1. From the navigation header, select **More** >  **Admin**.
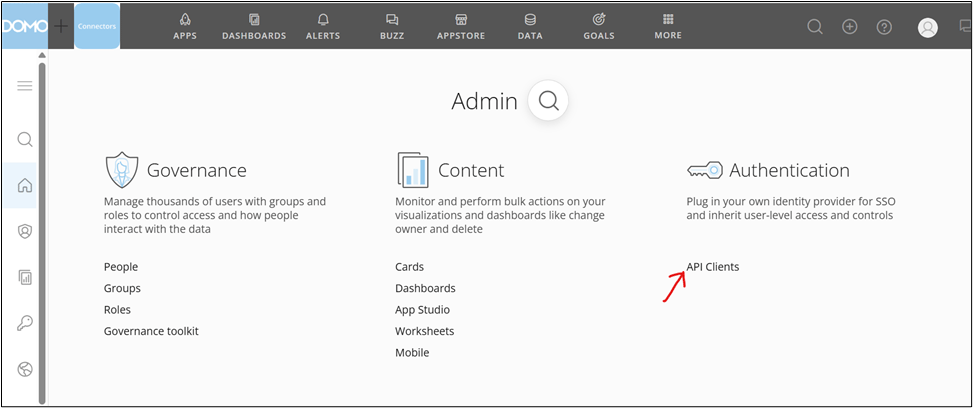
 2. In the **Authentication** section of the Admin Settings, click the **API Clients** page.
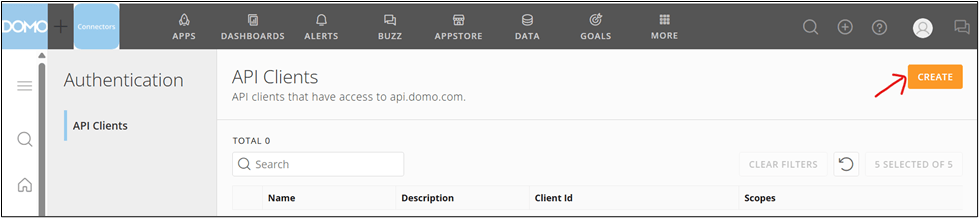
 3. In the top-right corner, click **Create**.
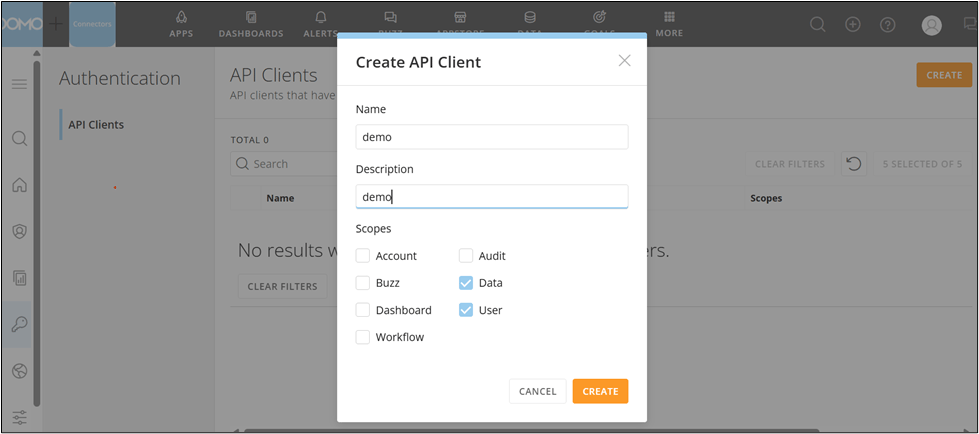
 The **Create API Client** window opens.
4. Enter the application Name and Description.
5. Under **Scopes**, select the **Data** and **User** checkbox, and click **Create**.
The **Create API Client** window opens.
4. Enter the application Name and Description.
5. Under **Scopes**, select the **Data** and **User** checkbox, and click **Create**.
 6. Copy and save the generated Client ID and Client Secret.
## Connecting to Your Salesforce Rest Writeback Account
This section enumerates the options in the **Credentials** and **Details** panes on the Salesforce Rest WritebackConnector page. The components of the other panes on this page, **Scheduling** and **Name & Describe Your DataSet**, are universal across most connector types and are discussed in great detail in [Adding a DataSet Using a Connector](/s/article/360042926274).
## Credentials Pane
This pane contains fields for entering credentials to connect to your Salesforce Rest Writeback account. The following table describes what is needed for each field:
| Field | Description |
| ---------------------- | -------------------------------------------------------------------------------------------------------------------------------------------------------------------------------------------------------------------------------------------------------------------- |
| Salesforce Environment | Select the Salesforce environment you want to authenticate against (i.e., login.salesforce.com or test.salesforce.com). Select the Salesforce Environment against which you want to authenticate. *(Options include: login.salesforce.com or test.salesforce.com)* |
| Domo Client ID | Enter the Domo Client ID. |
| Domo Client Secret | Enter the Domo Client Secret. |
Once you have entered valid Salesforce Rest Writeback credentials, you can use the same account at any time to create a new Salesforce Rest Writeback DataSet. You can manage connector accounts in the **Accounts** tab in the Data Center. For more information about this tab, see [Manage Connector Accounts](/s/article/360042926054).
## Details Pane
This pane contains four sections for selecting and configuring the data you want to send to Salesforce.
#### Writeback Type
In this section, you can choose whether you want to insert, update, or insert and update the data from a Domo DataSet into an existing Salesforce table. Your Salesforce objects will be populated automatically in the **Salesforce Setup**section of the **Details** pane, and you can choose the one you want to push data to.
#### Domo DataSet
Enter the DataSet ID (GUID) for the DataSet you want to copy to Salesforce. You can find the ID by opening the details view for the DataSet in the Data Center and looking at the portion of the URL following datasources/. For example, in the URL [https://mycompany.domo.com/datasources/845305d8-da3d-4107-a9d6-13ef3f86d4a4/details/overview](https://mycompany.domo.com/datasources/845305d8-da3d-4107-a9d6-13ef3f86d4a4/details/overview), the DataSet ID is 845305d8-da3d-4107-a9d6-13ef3f86d4a4.
**Note:** - After inserting the record, the Salesforce internal or external IDs are stored as GUID in the dataset
* The Salesforce Writeback Connector looks for a *\_BATCH\_ID\_* column. If this column is present in the input DataSet, the Connector will keep track of the highest *\_BATCH\_ID\_* in the source DataSet to keep track of the data already written to Salesforce. For the next run, the Connector will only write rows with a *\_BATCH\_ID\_* higher than the one recorded on previous runs. This is to avoid writing duplicate data to Salesforce. If the *\_BATCH\_ID\_* column is not present in the source DataSet, all the data will be written to Salesforce every time the Connector runs.
#### Salesforce Setup
If you select **Insert Data in Existing Table**in the **Writeback Type** section, your Salesforce objects appear here automatically, and you can choose the one you want to push data to.
#### Configuration Mapping
In this section, you can match the columns from your Domo DataSet with the desired Salesforce field.
For the required Salesforce fields, select the correct DataSet column.
For optional fields, match the desired Salesforce fields and DataSet columns.
## Other Panes
For information about the remaining sections of the connector interface, including how to configure scheduling, retry, and update options, see [Adding a DataSet Using a Connector](/s/article/360042926274).
6. Copy and save the generated Client ID and Client Secret.
## Connecting to Your Salesforce Rest Writeback Account
This section enumerates the options in the **Credentials** and **Details** panes on the Salesforce Rest WritebackConnector page. The components of the other panes on this page, **Scheduling** and **Name & Describe Your DataSet**, are universal across most connector types and are discussed in great detail in [Adding a DataSet Using a Connector](/s/article/360042926274).
## Credentials Pane
This pane contains fields for entering credentials to connect to your Salesforce Rest Writeback account. The following table describes what is needed for each field:
| Field | Description |
| ---------------------- | -------------------------------------------------------------------------------------------------------------------------------------------------------------------------------------------------------------------------------------------------------------------- |
| Salesforce Environment | Select the Salesforce environment you want to authenticate against (i.e., login.salesforce.com or test.salesforce.com). Select the Salesforce Environment against which you want to authenticate. *(Options include: login.salesforce.com or test.salesforce.com)* |
| Domo Client ID | Enter the Domo Client ID. |
| Domo Client Secret | Enter the Domo Client Secret. |
Once you have entered valid Salesforce Rest Writeback credentials, you can use the same account at any time to create a new Salesforce Rest Writeback DataSet. You can manage connector accounts in the **Accounts** tab in the Data Center. For more information about this tab, see [Manage Connector Accounts](/s/article/360042926054).
## Details Pane
This pane contains four sections for selecting and configuring the data you want to send to Salesforce.
#### Writeback Type
In this section, you can choose whether you want to insert, update, or insert and update the data from a Domo DataSet into an existing Salesforce table. Your Salesforce objects will be populated automatically in the **Salesforce Setup**section of the **Details** pane, and you can choose the one you want to push data to.
#### Domo DataSet
Enter the DataSet ID (GUID) for the DataSet you want to copy to Salesforce. You can find the ID by opening the details view for the DataSet in the Data Center and looking at the portion of the URL following datasources/. For example, in the URL [https://mycompany.domo.com/datasources/845305d8-da3d-4107-a9d6-13ef3f86d4a4/details/overview](https://mycompany.domo.com/datasources/845305d8-da3d-4107-a9d6-13ef3f86d4a4/details/overview), the DataSet ID is 845305d8-da3d-4107-a9d6-13ef3f86d4a4.
**Note:** - After inserting the record, the Salesforce internal or external IDs are stored as GUID in the dataset
* The Salesforce Writeback Connector looks for a *\_BATCH\_ID\_* column. If this column is present in the input DataSet, the Connector will keep track of the highest *\_BATCH\_ID\_* in the source DataSet to keep track of the data already written to Salesforce. For the next run, the Connector will only write rows with a *\_BATCH\_ID\_* higher than the one recorded on previous runs. This is to avoid writing duplicate data to Salesforce. If the *\_BATCH\_ID\_* column is not present in the source DataSet, all the data will be written to Salesforce every time the Connector runs.
#### Salesforce Setup
If you select **Insert Data in Existing Table**in the **Writeback Type** section, your Salesforce objects appear here automatically, and you can choose the one you want to push data to.
#### Configuration Mapping
In this section, you can match the columns from your Domo DataSet with the desired Salesforce field.
For the required Salesforce fields, select the correct DataSet column.
For optional fields, match the desired Salesforce fields and DataSet columns.
## Other Panes
For information about the remaining sections of the connector interface, including how to configure scheduling, retry, and update options, see [Adding a DataSet Using a Connector](/s/article/360042926274).