> ## Documentation Index
> Fetch the complete documentation index at: https://domoinc-bradley-turek-pfilter-operators-reference.mintlify.site/llms.txt
> Use this file to discover all available pages before exploring further.

# Slideshow Publications Page Layout

## Intro

In the Slideshow Publications page, you can create and and manage slideshows of your cards. When you save a slideshow, the slideshow appears in the Slideshow Publications page; you can access options for the slideshow (such as editing, deleting, etc.) by mousing over the slideshow.

Access this page by clicking **More** in the toolbar at the top of the screen then selecting **Slideshow Publications**.

<Note>
  **Note:** This topic discusses the general layout of the **Slideshow Publications** page. For information about creating and managing slideshows, see [Sharing Content Using Slideshows](/s/article/360043437793 "Sharing Content Using Slideshows").
</Note>

## Create New Slideshow dialog

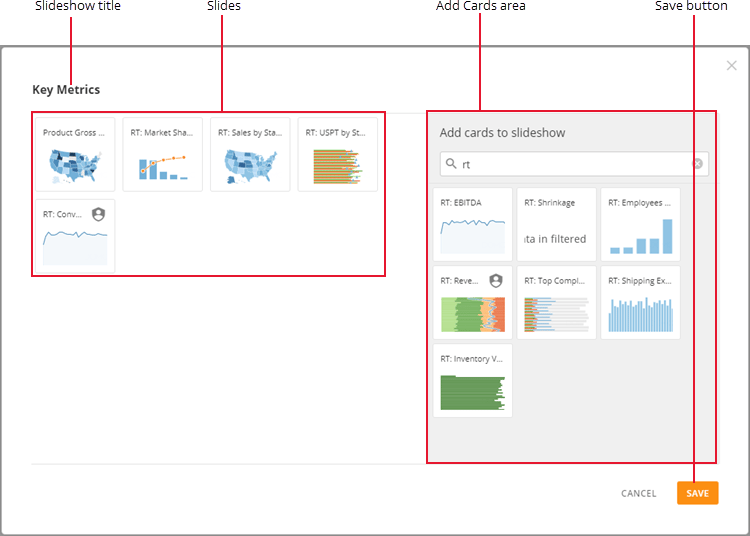
You can create a slideshow by clicking **New Slideshow**, which displays a dialog where you can add or remove slides.

The following screenshot shows the most important parts of this dialog:

<Frame>
  <img alt="publish_slideshow_dialog.png" src="https://mintcdn.com/domoinc-bradley-turek-pfilter-operators-reference/c9C76UejK0wszR1k/images/kb/ka05w00000123Xu-00N5w00000Ri7BU-0EM5w000005vOVY.png?fit=max&auto=format&n=c9C76UejK0wszR1k&q=85&s=ed56fe62f12df2e1b6894ce6eb975192" width="750" height="536" data-path="images/kb/ka05w00000123Xu-00N5w00000Ri7BU-0EM5w000005vOVY.png" />
</Frame>

You can learn more about these components in the following table:

<table border="1" cellpadding="1" cellspacing="1" data-aura-rendered-by="33:208;a"><thead><tr><th colspan="1" rowspan="1"><p> Name </p></th><th colspan="1" rowspan="1"><p> Description </p></th></tr></thead><tbody><tr><td colspan="1" rowspan="1"><p> Slideshow title </p></td><td colspan="1" rowspan="1"><p> Contains the title of this slideshow. If you want, you can enter your own title; otherwise, the slideshow will be called "Untitled." </p></td></tr><tr><td colspan="1" rowspan="1"><p> Slides </p></td><td colspan="1" rowspan="1"><p> Displays slides of cards added to this slideshow. You can remove a slide from the slideshow by mousing over a slide then clicking the "x" that appears. </p></td></tr><tr><td colspan="1" rowspan="1"><p> Add cards area </p></td><td colspan="1" rowspan="1"><p> Lets you search for cards by name that you can click to add slides. </p></td></tr><tr><td colspan="1" rowspan="1"><p> Save button </p></td><td colspan="1" rowspan="1"><p> Saves the selected cards as a slideshow. </p></td></tr></tbody></table>

## Slideshow Publications page

After you create a slideshow, the slideshow appears in the **Slideshow Publications** page. Each slideshow displays its title, the number of cards it contains, and its publish status. The publish status of a slideshow may be any of the following:

<table border="1" cellpadding="1" cellspacing="1" data-aura-rendered-by="33:208;a"><thead><tr><th colspan="1" rowspan="1"><p> Publish status </p></th><th colspan="1" rowspan="1"><p> Description </p></th></tr></thead><tbody><tr><td colspan="1" rowspan="1"><p> Not Published </p></td><td colspan="1" rowspan="1"><p> The slideshow has been published but is not being shared with others—no URL has been generated. </p></td></tr><tr><td colspan="1" rowspan="1"><p> Public </p></td><td colspan="1" rowspan="1"><p> The slideshow can be accessed on the Web using the URL. </p></td></tr><tr><td colspan="1" rowspan="1"><p> Private </p></td><td colspan="1" rowspan="1"><p> The slideshow can be accessed on the Web using the URL and the access code. </p></td></tr></tbody></table>

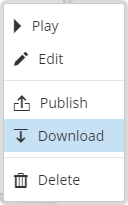
In the wrench menu for a slideshow, you can access various options.

<Frame>
  <img alt="" src="https://mintcdn.com/domoinc-bradley-turek-pfilter-operators-reference/c9C76UejK0wszR1k/images/kb/ka05w00000123Xu-00N5w00000Ri7BU-0EM5w000005vOVZ.png?fit=max&auto=format&n=c9C76UejK0wszR1k&q=85&s=d2c9be19f8090ee7eb610f3fe551b573" width="128" height="205" data-path="images/kb/ka05w00000123Xu-00N5w00000Ri7BU-0EM5w000005vOVZ.png" />
</Frame>

<table border="1" cellpadding="1" cellspacing="1" data-aura-rendered-by="33:208;a"><thead><tr><th colspan="1" rowspan="1"><p> Option </p></th><th colspan="1" rowspan="1"><p> Description </p></th></tr></thead><tbody><tr><td colspan="1" rowspan="1"><p> Play </p></td><td colspan="1" rowspan="1"><p> Plays the slideshow in the viewer in Domo. For more information about the slideshow viewer, see <a href="/s/article/360043437793" target="_self"> Using the Slideshow Viewer </a>. </p></td></tr><tr><td colspan="1" rowspan="1"><p> Download </p></td><td colspan="1" rowspan="1"><p> Exports the slides in the slideshow as a Microsoft PowerPoint presentation. For more information, see <a href="/s/article/360043437793" target="_self"> Exporting Slideshow Publications </a>. </p></td></tr><tr><td colspan="1" rowspan="1"><p> Edit </p></td><td colspan="1" rowspan="1"><p> Opens a dialog where you can add or remove card slides, reorder slides, and rename the slideshow. Any changes you make are saved when you click <b> Save </b>. </p></td></tr><tr><td colspan="1" rowspan="1"><p> Publish </p></td><td colspan="1" rowspan="1"><p> Displays a dialog where you can set the options for sharing the slideshow. </p></td></tr><tr><td colspan="1" rowspan="1"><p> Delete </p></td><td colspan="1" rowspan="1"><p> Deletes the slideshow from Domo. </p></td></tr></tbody></table>

## Publish dialog

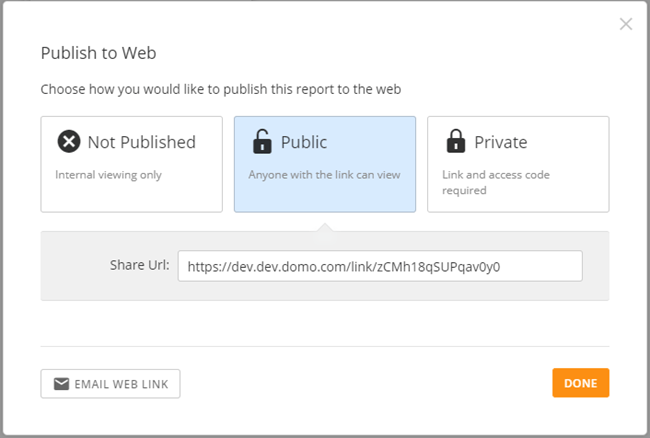
You can publish a slideshow by mousing over a slideshow, then clicking **Publish**, which displays a dialog where you can set publish options.

<Frame>
  <img alt="slideshow_publish.png" src="https://mintcdn.com/domoinc-bradley-turek-pfilter-operators-reference/c9C76UejK0wszR1k/images/kb/ka05w00000123Xu-00N5w00000Ri7BU-0EM5w000005vOVa.png?fit=max&auto=format&n=c9C76UejK0wszR1k&q=85&s=896be201b89b0ca1883326b2e212919d" width="650" height="438" data-path="images/kb/ka05w00000123Xu-00N5w00000Ri7BU-0EM5w000005vOVa.png" />
</Frame>

<table border="1" cellpadding="1" cellspacing="1" data-aura-rendered-by="33:208;a"><thead><tr><th colspan="1" rowspan="1"><p> Publish Status </p></th><th colspan="1" rowspan="1"><p> Description </p></th></tr></thead><tbody><tr><td colspan="1" rowspan="1"><p> Not Published </p></td><td colspan="1" rowspan="1"><p> The slideshow is not published. Others cannot view the slideshow on the Web. </p></td></tr><tr><td colspan="1" rowspan="1"><p> Public </p></td><td colspan="1" rowspan="1"><p> The slideshow can be viewed on the Web using its URL (without an access code). </p></td></tr><tr><td colspan="1" rowspan="1"><p> Private </p></td><td colspan="1" rowspan="1"><p> The slideshow can be viewed on the Web using its URL and an access code. </p></td></tr></tbody></table>

When publishing a slideshow, you can also send an email, with the URL and access code, inviting others to view the slideshow.