> ## Documentation Index
> Fetch the complete documentation index at: https://domoinc-bradley-turek-pfilter-operators-reference.mintlify.site/llms.txt
> Use this file to discover all available pages before exploring further.
# Connect AI Tools to Domo Using MCP
**Note:** This feature is in public open beta. To participate, simply follow the instructions in this article. Domo AI is available to customers on a consumption agreement. Those not on a consumption agreement can request a trial by reaching out to their Customer Success Manager (CSM).
## Intro
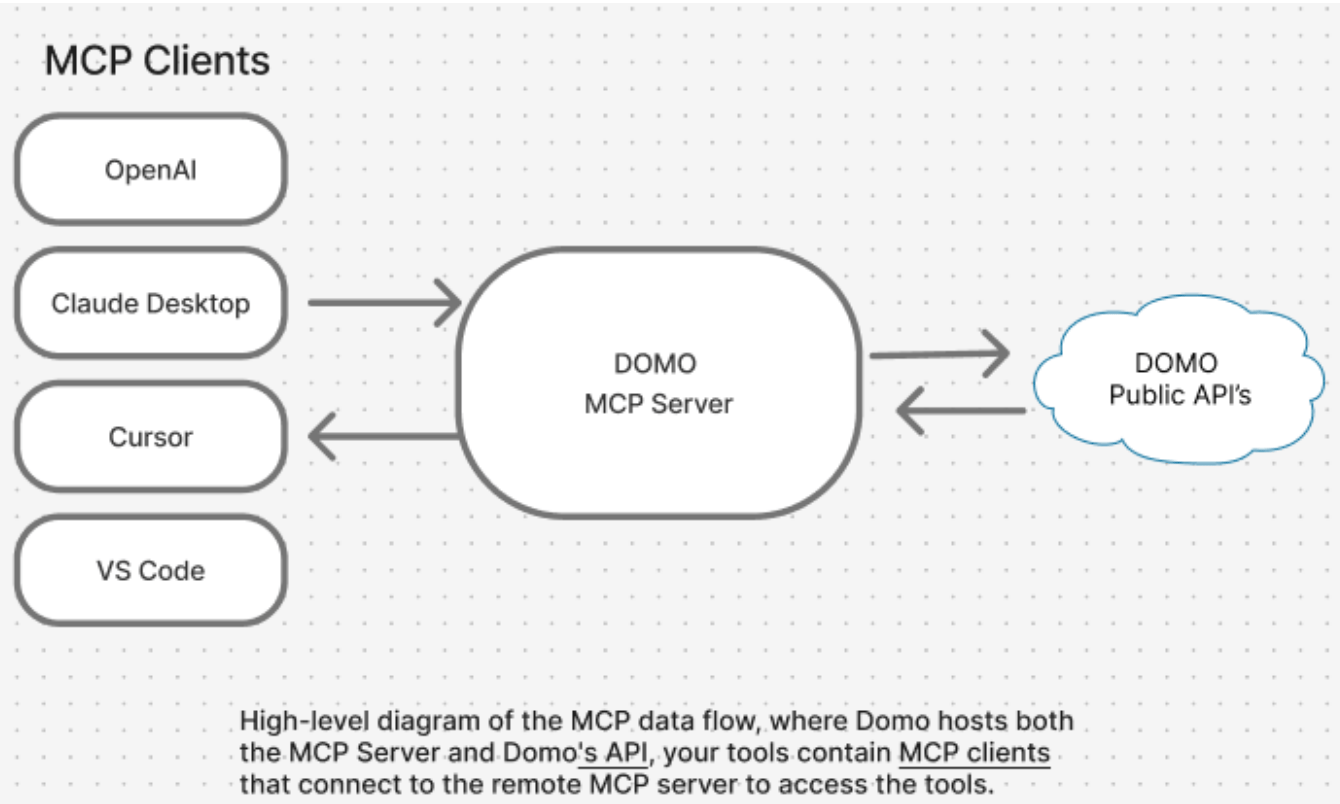
The Model Context Protocol (MCP) is an open standard that allows AI assistants to securely interact with external platforms and data sources. Domo's MCP Server is a hosted service that gives AI tools — such as Claude, Cursor, VS Code, and ChatGPT — secure access to your Domo instance.
After you're connected, you can use your AI tool to:
* Query data in your Domo DataSets
* Query documents stored in Domo
* Search across your Domo instance
* Summarize cards and pages (coming soon)
This article walks through how to connect Claude Desktop, Claude Code, or VS Code to the Domo MCP Server and verify your connection.
 ***
## Required Grants
The following grants allow you to use the AI Library feature.
* **Use AI Services -** Access to features and Apps built using the AI Services Layer.
* **Use AI Chat -** Access to the Domo AI Assistant.
Learn about [grants and custom roles](https://domo-support.domo.com/s/article/360043438973?language=en_US).
## Prerequisites
Before connecting, ensure you have the following:
* **Node.js** version 21 or higher installed. Use [nvm](https://github.com/nvm-sh/nvm) to manage your Node.js version.
* A Domo **Access Token** with appropriate permissions. You can provision one at **Admin** > **Authentication** > **Access Tokens**, or request one from your MajorDomo. See [Manage Access Tokens](/s/article/360042934494#manage-access-tokens) for instructions.
* A supported AI code editor (Claude Desktop, Claude Code, VS Code, Cursor, or another MCP-compatible client).
## Connect Claude Desktop
Claude Desktop does not natively support remote MCP servers, so you connect using `mcp-remote` — an NPM tool that bridges desktop AI clients to remote MCP servers.
### Step 1: Provision an Access Token
In your Domo instance, go to **Admin** > **Authentication** > **Access Tokens** and generate a token. See [Manage Access Tokens](/s/article/360042934494#manage-access-tokens) for instructions.
***
## Required Grants
The following grants allow you to use the AI Library feature.
* **Use AI Services -** Access to features and Apps built using the AI Services Layer.
* **Use AI Chat -** Access to the Domo AI Assistant.
Learn about [grants and custom roles](https://domo-support.domo.com/s/article/360043438973?language=en_US).
## Prerequisites
Before connecting, ensure you have the following:
* **Node.js** version 21 or higher installed. Use [nvm](https://github.com/nvm-sh/nvm) to manage your Node.js version.
* A Domo **Access Token** with appropriate permissions. You can provision one at **Admin** > **Authentication** > **Access Tokens**, or request one from your MajorDomo. See [Manage Access Tokens](/s/article/360042934494#manage-access-tokens) for instructions.
* A supported AI code editor (Claude Desktop, Claude Code, VS Code, Cursor, or another MCP-compatible client).
## Connect Claude Desktop
Claude Desktop does not natively support remote MCP servers, so you connect using `mcp-remote` — an NPM tool that bridges desktop AI clients to remote MCP servers.
### Step 1: Provision an Access Token
In your Domo instance, go to **Admin** > **Authentication** > **Access Tokens** and generate a token. See [Manage Access Tokens](/s/article/360042934494#manage-access-tokens) for instructions.
 ### Step 2: Install mcp-remote
Open a terminal and run:
```
npm install mcp-remote
```
### Step 3: Install Claude Desktop
Download and install [Claude Desktop](https://claude.ai/download).
### Step 2: Install mcp-remote
Open a terminal and run:
```
npm install mcp-remote
```
### Step 3: Install Claude Desktop
Download and install [Claude Desktop](https://claude.ai/download).
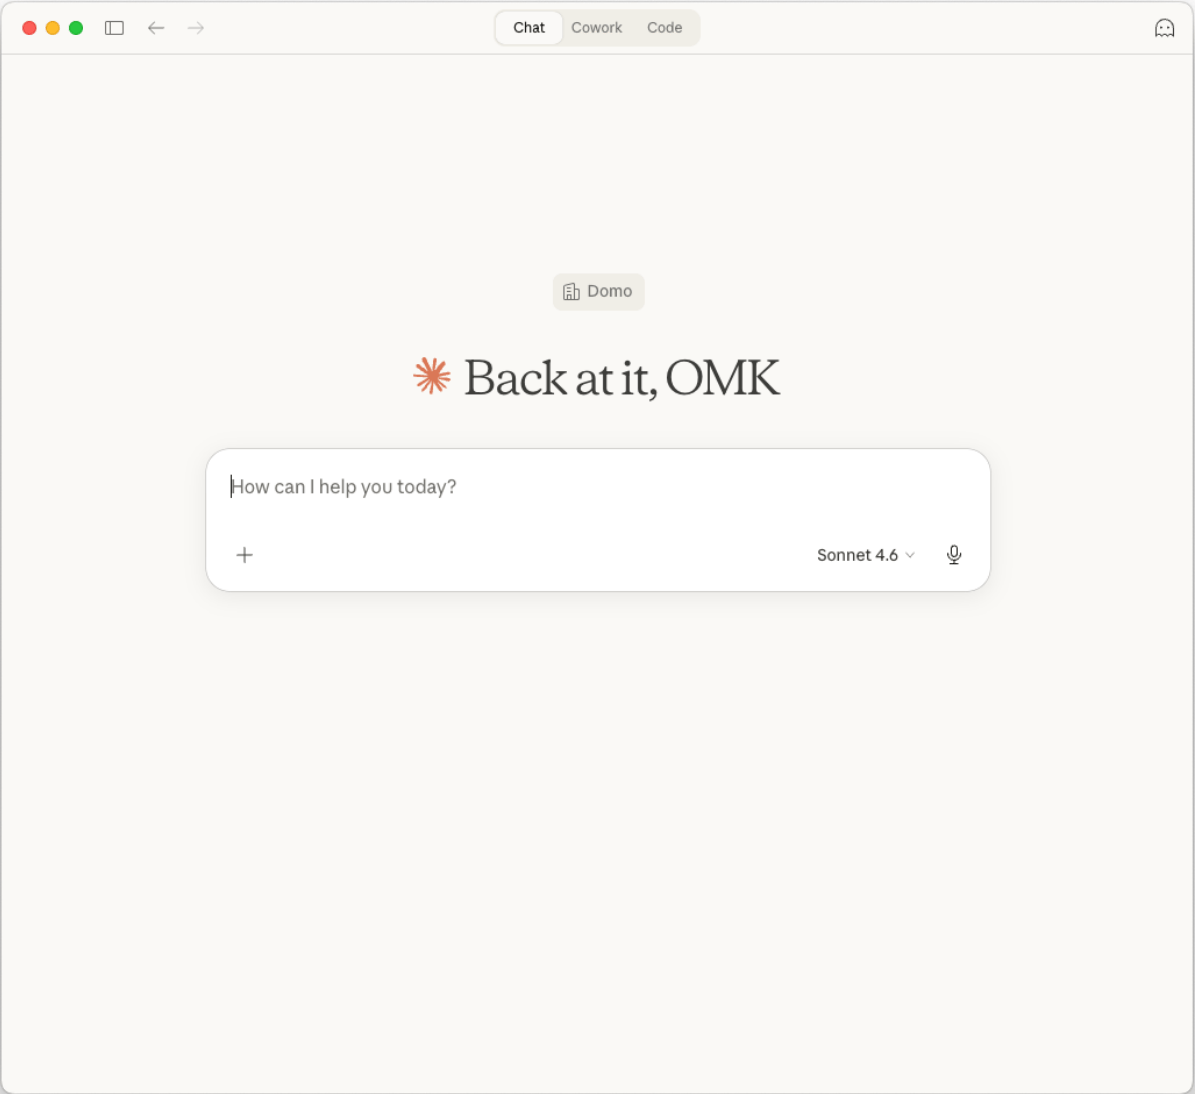 ### Step 4: Edit the Claude Desktop configuration
In Claude Desktop, go to **Settings** > **Developer** and select **Edit Config**.
### Step 4: Edit the Claude Desktop configuration
In Claude Desktop, go to **Settings** > **Developer** and select **Edit Config**.
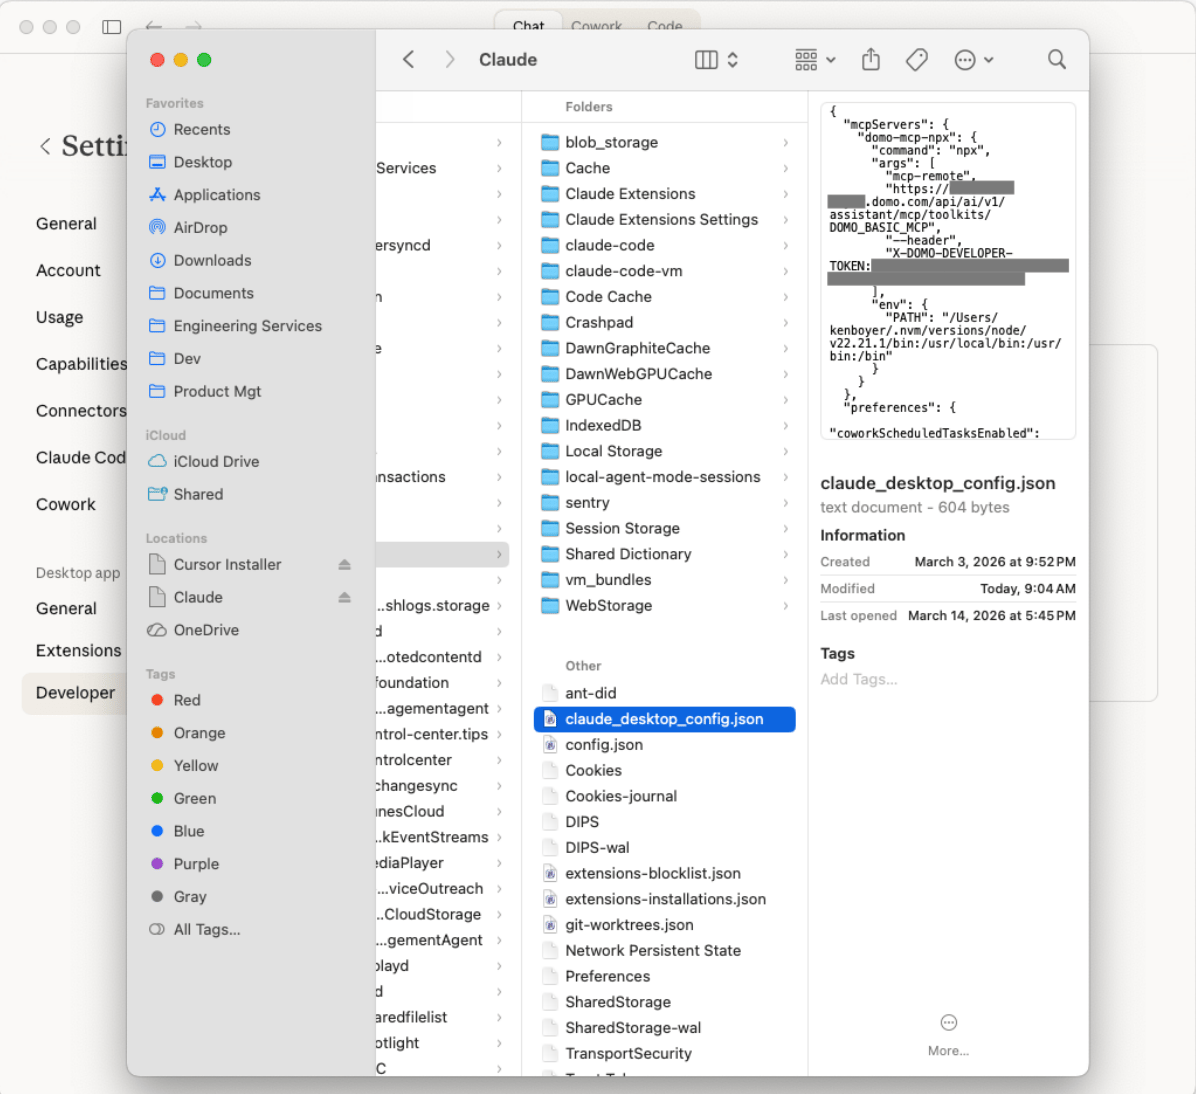
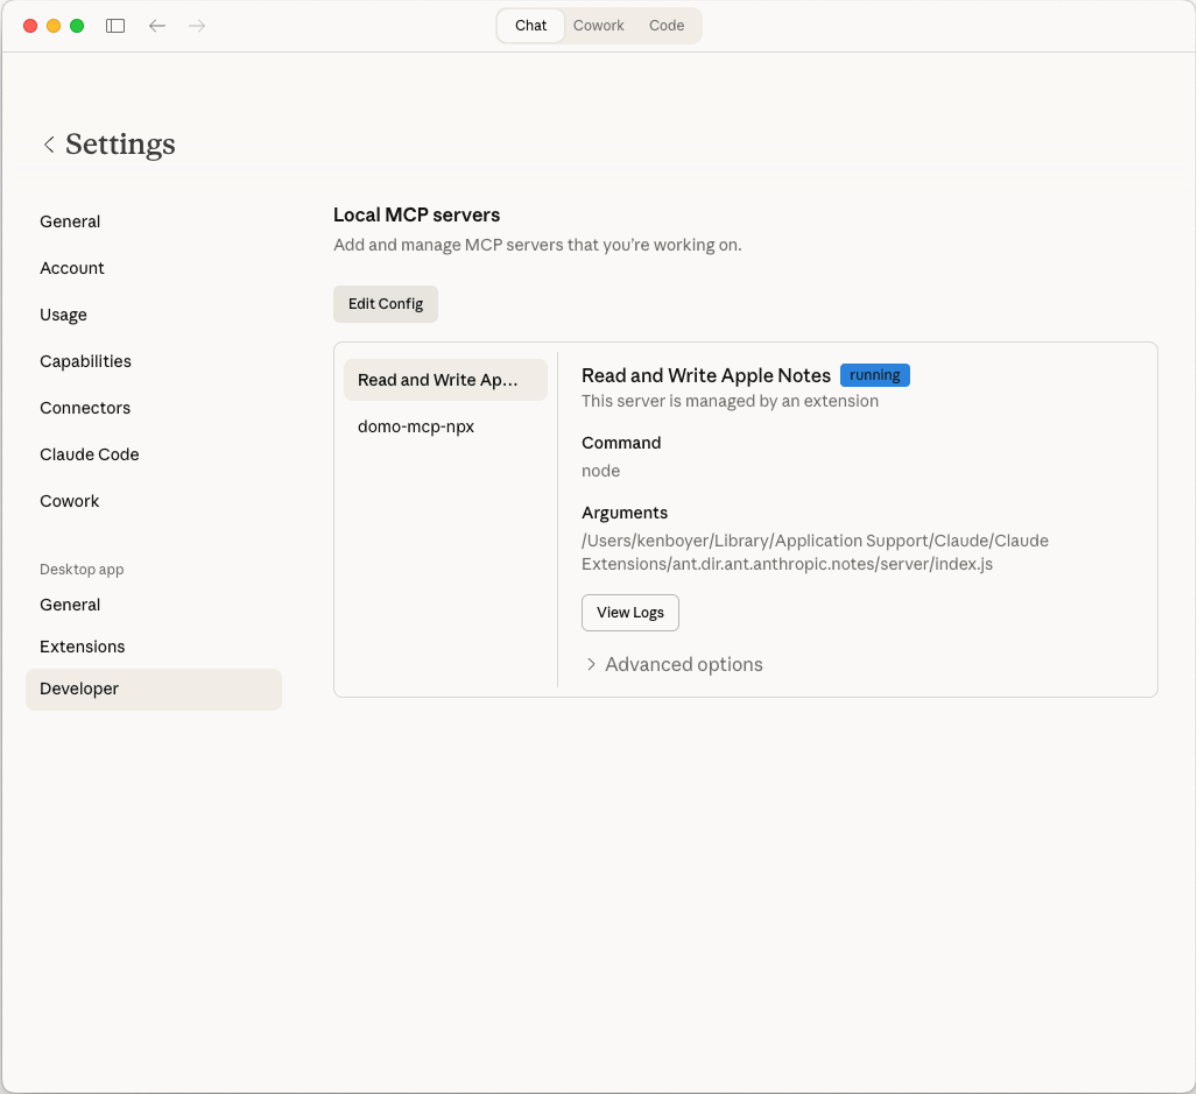 This opens the configuration file located at:
```
/Users//Library/Application Support/Claude/claude_desktop_config.json
```
This opens the configuration file located at:
```
/Users//Library/Application Support/Claude/claude_desktop_config.json
```
 ### Step 5: Add the Domo MCP Server configuration
Paste the following into the configuration file, replacing `` with your Domo instance domain and `` with your Access Token:
```json theme={"dark"}
{
"mcpServers": {
"domo-mcp-npx": {
"command": "npx",
"args": [
"mcp-remote",
"https:///api/ai/v1/assistant/mcp/toolkits/DOMO_BASIC_MCP",
"--header",
"X-DOMO-DEVELOPER-TOKEN:"
]
}
}
}
```
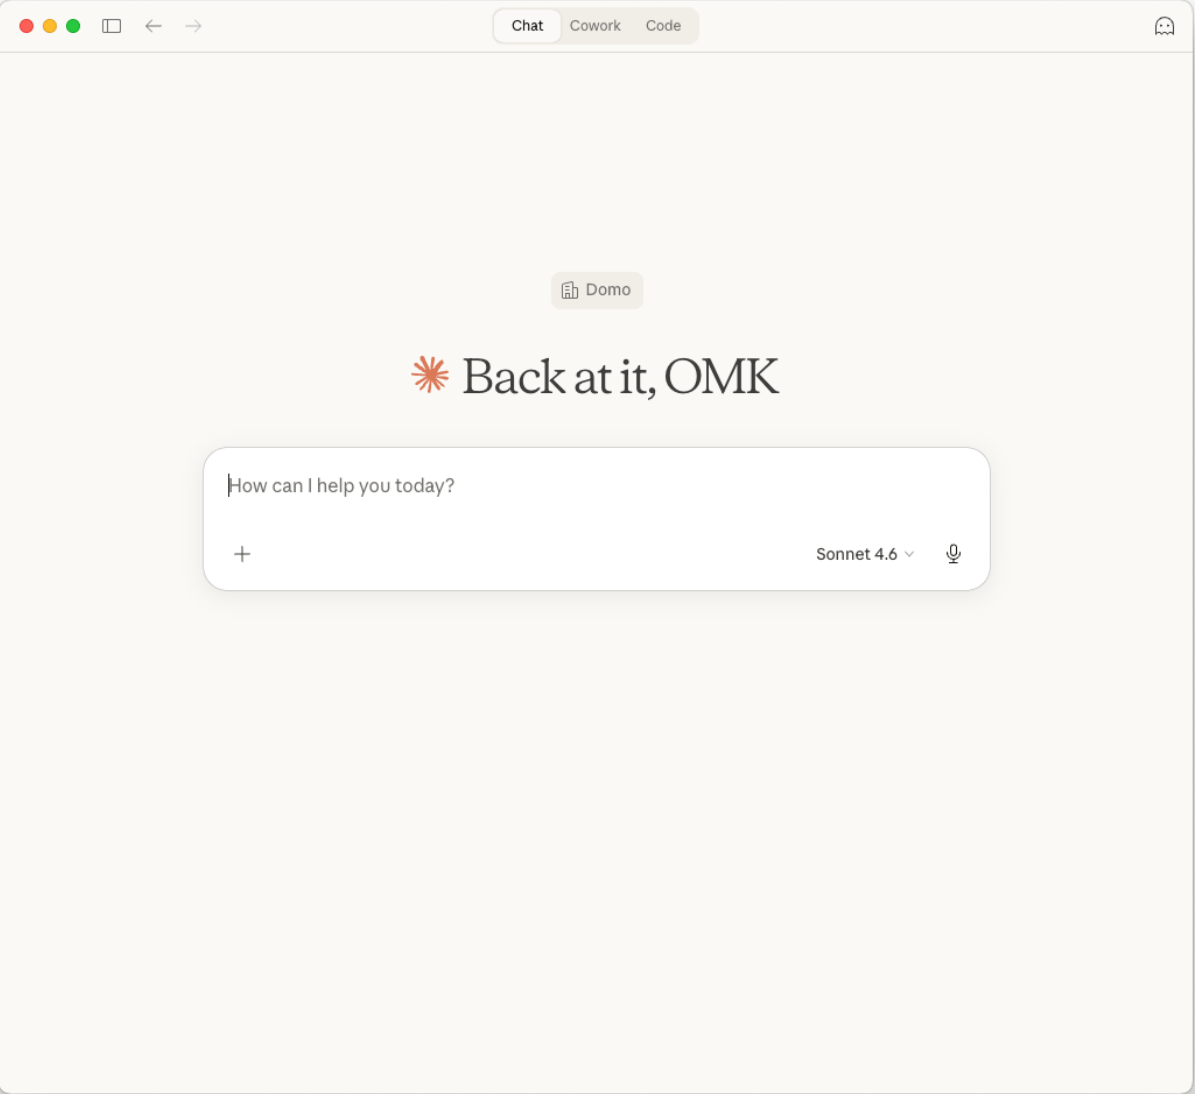
### Step 6: Restart Claude Desktop
Quit and restart Claude Desktop for the configuration to take effect.
### Step 5: Add the Domo MCP Server configuration
Paste the following into the configuration file, replacing `` with your Domo instance domain and `` with your Access Token:
```json theme={"dark"}
{
"mcpServers": {
"domo-mcp-npx": {
"command": "npx",
"args": [
"mcp-remote",
"https:///api/ai/v1/assistant/mcp/toolkits/DOMO_BASIC_MCP",
"--header",
"X-DOMO-DEVELOPER-TOKEN:"
]
}
}
}
```
### Step 6: Restart Claude Desktop
Quit and restart Claude Desktop for the configuration to take effect.
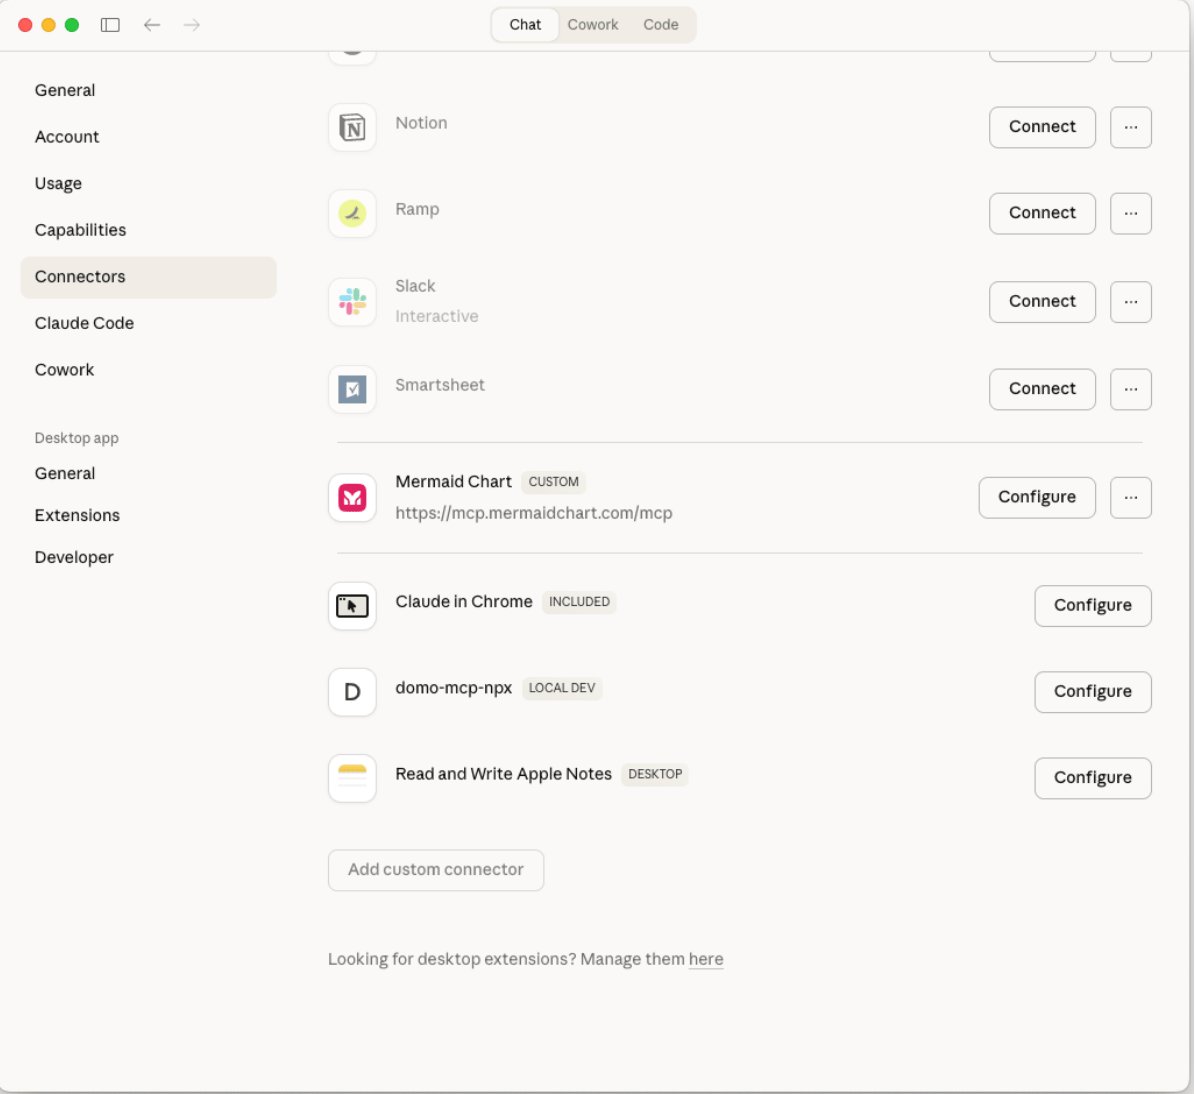
 ### Step 7: Verify the connection
Go to **Settings** > **Connectors** and confirm the Domo MCP server is listed and connected.
### Step 7: Verify the connection
Go to **Settings** > **Connectors** and confirm the Domo MCP server is listed and connected.
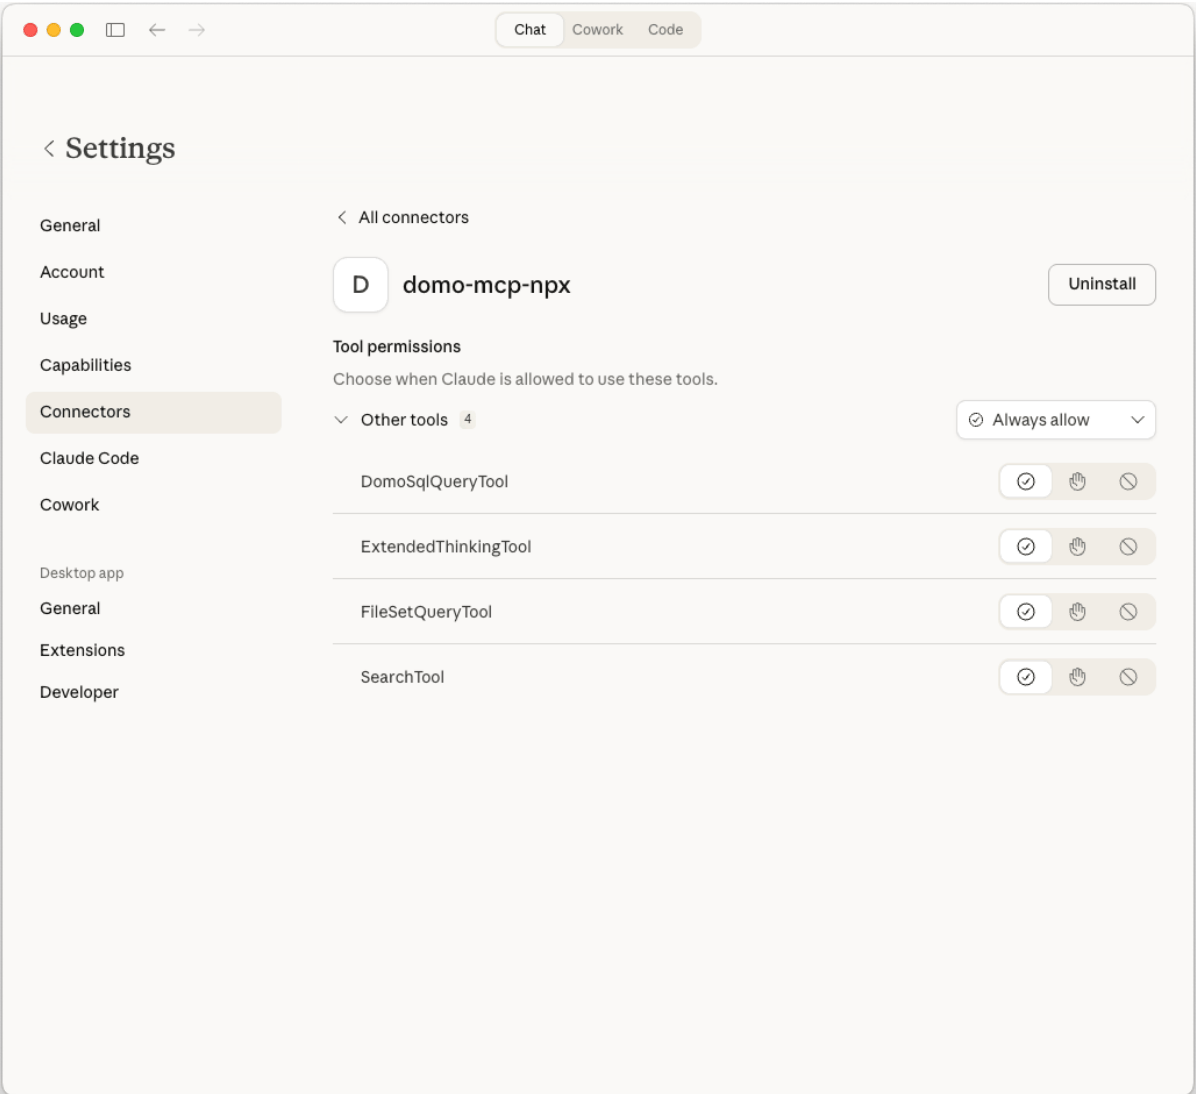
 Select the server to view its tool permissions. You should see the following tools listed:
* `DomoSqlQueryTool`
* `ExtendedThinkingTool`
* `FileSetQueryTool`
* `SearchTool`
Select the server to view its tool permissions. You should see the following tools listed:
* `DomoSqlQueryTool`
* `ExtendedThinkingTool`
* `FileSetQueryTool`
* `SearchTool`
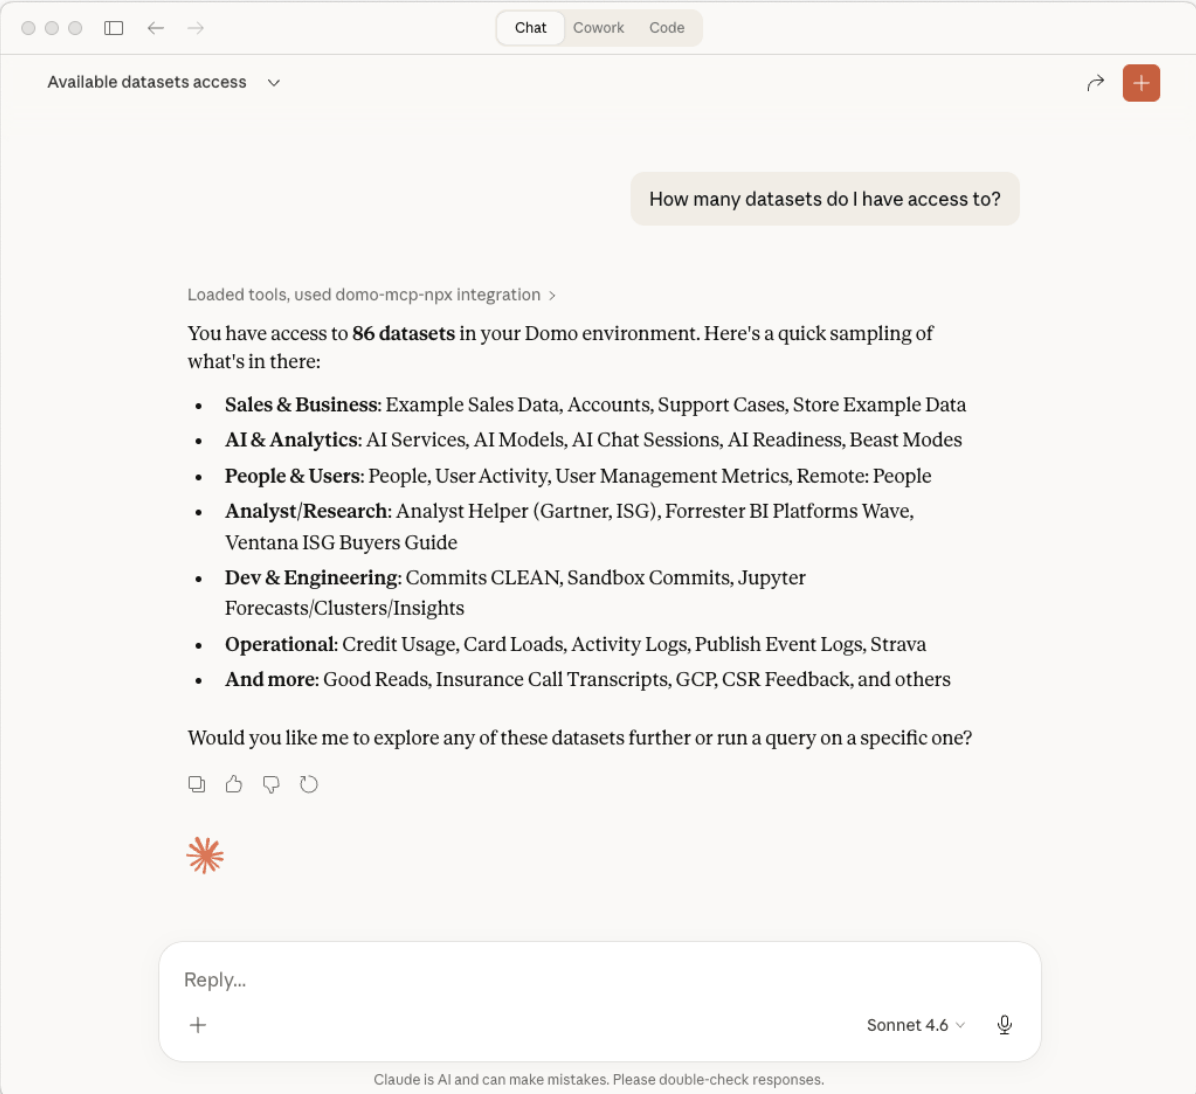
 To test the connection, try a prompt such as: "How many datasets do I have access to?"
 ## Connect Claude Code
In Claude Code, run the following command from the root of your project. Replace `` with your Domo instance domain and `` with your Access Token:
```bash theme={"dark"}
claude mcp add --transport http domo-mcp \
https:///api/ai/v1/assistant/mcp/toolkits/DOMO_BASIC_MCP \
--header "X-DOMO-DEVELOPER-TOKEN: "
```
This adds the configuration to a `.mcp` file in the root of your project:
```json theme={"dark"}
{
"mcpServers": {
"domo-mcp": {
"type": "http",
"url": "https:///api/ai/v1/assistant/mcp/toolkits/DOMO_BASIC_MCP",
"headers": {
"X-DOMO-DEVELOPER-TOKEN": ""
}
}
}
}
```
## Connect VS Code
1. Open the Command Palette with **Cmd+Shift+P** (Mac) or **Ctrl+Shift+P** (Windows/Linux).
2. Choose your configuration scope:
* For a **global (user) configuration** (recommended) available across all workspaces, search for and select **MCP: Open User Configuration**.
* For a **workspace-specific configuration** (not recommended for security, as it may expose your credentials), search for and select **MCP: Open Workspace Folder MCP Configuration**. This creates or opens `.vscode/mcp.json`.
* For a **WSL configuration**, search for and select **MCP: Open Remote User MCP Configuration**. This creates or opens `~/.vscode-server/data/User/mcp.json`.
3. Add the following entry for `domo-mcp` to the `servers` object and `domo-access-token` to the `inputs` array in the configuration file. Replace `` with your Domo instance domain. You'll be prompted to enter your Access Token when you start the server:
```json theme={"dark"}
{
"servers": {
"domo-mcp": {
"url": "https:///api/ai/v1/assistant/mcp/toolkits/DOMO_BASIC_MCP",
"type": "http",
"headers": {
"X-DOMO-DEVELOPER-TOKEN": "${input:domo-access-token}"
}
}
},
"inputs": [
{
"id": "domo-access-token",
"type": "promptString",
"description": "Domo Access Token",
"password": true
}
]
}
```
## Troubleshoot
Depending on your environment, you may need to make additional changes to the Claude Desktop configuration.
**Mac**
If `npx` cannot be found, add an `env` property to the `domo-mcp-npx` server entry in your configuration, replacing `` with your home directory path:
```json theme={"dark"}
"env": {
"PATH": "/.nvm/versions/node/v22.21.1/bin:/usr/local/bin:/usr/bin:/bin"
}
```
**Windows**
If `npx` cannot be found, replace the `"command"` value in your configuration with the full path to the `npx` executable, for example:
```json theme={"dark"}
"command": "C:\\Program Files\\nodejs\\npx.cmd"
```
## FAQ
The Domo MCP Server works with any MCP-compatible AI client, including Claude
Desktop, Claude Code, VS Code, Cursor, and ChatGPT.
After you're connected, you can query your Domo DataSets, query documents
stored in Domo, and search across your Domo instance. Card and page
summarization are coming soon.
Your user will need the following grants enabled: **Use AI Chat** & **Use AI Services**.
## Connect Claude Code
In Claude Code, run the following command from the root of your project. Replace `` with your Domo instance domain and `` with your Access Token:
```bash theme={"dark"}
claude mcp add --transport http domo-mcp \
https:///api/ai/v1/assistant/mcp/toolkits/DOMO_BASIC_MCP \
--header "X-DOMO-DEVELOPER-TOKEN: "
```
This adds the configuration to a `.mcp` file in the root of your project:
```json theme={"dark"}
{
"mcpServers": {
"domo-mcp": {
"type": "http",
"url": "https:///api/ai/v1/assistant/mcp/toolkits/DOMO_BASIC_MCP",
"headers": {
"X-DOMO-DEVELOPER-TOKEN": ""
}
}
}
}
```
## Connect VS Code
1. Open the Command Palette with **Cmd+Shift+P** (Mac) or **Ctrl+Shift+P** (Windows/Linux).
2. Choose your configuration scope:
* For a **global (user) configuration** (recommended) available across all workspaces, search for and select **MCP: Open User Configuration**.
* For a **workspace-specific configuration** (not recommended for security, as it may expose your credentials), search for and select **MCP: Open Workspace Folder MCP Configuration**. This creates or opens `.vscode/mcp.json`.
* For a **WSL configuration**, search for and select **MCP: Open Remote User MCP Configuration**. This creates or opens `~/.vscode-server/data/User/mcp.json`.
3. Add the following entry for `domo-mcp` to the `servers` object and `domo-access-token` to the `inputs` array in the configuration file. Replace `` with your Domo instance domain. You'll be prompted to enter your Access Token when you start the server:
```json theme={"dark"}
{
"servers": {
"domo-mcp": {
"url": "https:///api/ai/v1/assistant/mcp/toolkits/DOMO_BASIC_MCP",
"type": "http",
"headers": {
"X-DOMO-DEVELOPER-TOKEN": "${input:domo-access-token}"
}
}
},
"inputs": [
{
"id": "domo-access-token",
"type": "promptString",
"description": "Domo Access Token",
"password": true
}
]
}
```
## Troubleshoot
Depending on your environment, you may need to make additional changes to the Claude Desktop configuration.
**Mac**
If `npx` cannot be found, add an `env` property to the `domo-mcp-npx` server entry in your configuration, replacing `` with your home directory path:
```json theme={"dark"}
"env": {
"PATH": "/.nvm/versions/node/v22.21.1/bin:/usr/local/bin:/usr/bin:/bin"
}
```
**Windows**
If `npx` cannot be found, replace the `"command"` value in your configuration with the full path to the `npx` executable, for example:
```json theme={"dark"}
"command": "C:\\Program Files\\nodejs\\npx.cmd"
```
## FAQ
The Domo MCP Server works with any MCP-compatible AI client, including Claude
Desktop, Claude Code, VS Code, Cursor, and ChatGPT.
After you're connected, you can query your Domo DataSets, query documents
stored in Domo, and search across your Domo instance. Card and page
summarization are coming soon.
Your user will need the following grants enabled: **Use AI Chat** & **Use AI Services**.